
Time to dust off the cobwebs and do some “legacy” development! In this blog, I’m going to show you how to get to a point where you can start writing Java code on the HMS Anybus Communicator.
I find that it doesn’t matter what language you code in, the tricky bit is getting to the point where you can simply create and run the time-honoured “Hello World!” program. Using new editors, sorting out dependencies, and making physical hardware connections can take up a big chunk of your time.
First, some information on the hardware platform:
The Anybus brand from HMS contains hundreds of gateways (or protocol converters) that can be used to convert between common industrial communications protocols such as PROFIBUS, MODBUS, Ethernet/IP, ControlNet, DeviceNet, PROFINET, CANOpen, J1939, etc. Check out anybus.com for a full list of protocols supported out of the box. Using these gateways you can for instance read registers from a MODBUS device and make them available to a PROFINET Controller. All it takes is the configuration of the gateway and no programming!
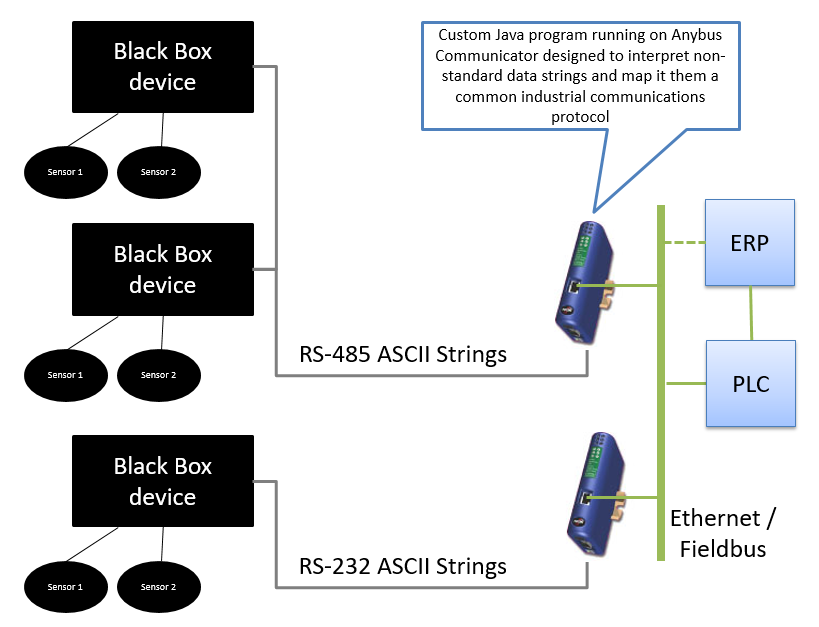
What if I want to get information from some black box device that does not speak a common industrial data communications protocol and pass that information to a PLC that does speak a specific industrial protocol? Well, then you’re going to need some sort of hardware platform that a programmer can use to write code that can interpret or decode the propriety protocol that the non-standardised device speaks and map that to a standardised protocol.
If the proprietary protocol is serial-based (RS-232) then you can use a Java-enabled Anybus Communicator, write Java code to decode the RS-232 ASCII strings, manipulate the data and map that to the standardized protocol, load the compiled program onto there, and deploy the solution.
Understanding the bigger picture:
You might be using a machine on your site where the vendor of that machine is great at the science of what they do, but the only problem is, the data it collects is in a “silo”:
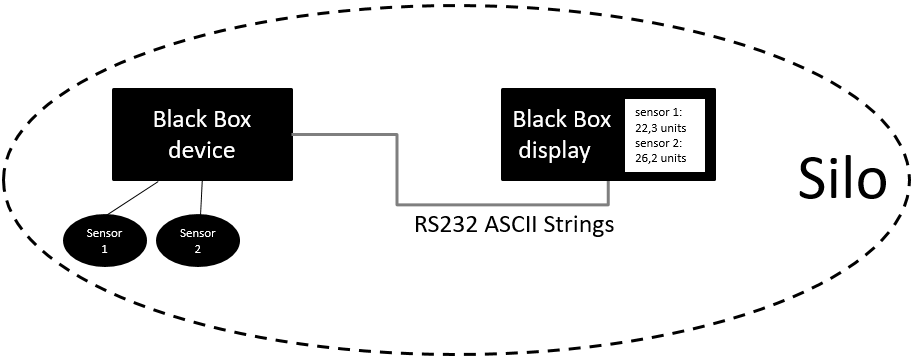
This means that one has to first walk to the location to take down reading and secondly, there is no way to monitor in real-time OEE performance of the machine, how much it’s producing, the quality of the product and if it’s even available at all. We’ve been in the fourth industrial revolution for a while now, it is the time of IIOT and we expect everything to be connected. Using gateways allows you to incorporate these silos so that data is accessible from a central location or you can even remotely control your machine:
So the big picture is that one wants to be able to monitor an asset’s performance, production quality and availability so that Business Intelligence can be applied to make production-related decisions. Okay, now that we understand why we want to do this, let’s get going with how we’re going to do this…
Setting up your development environment:
1. Install the JAVA SE Development Kit (JDK)
The JDK can be downloaded from the Oracle website. You’ll need to install this to compile the Java code that you’ll be writing. The appropriate JDK for your OS can be found here.
2. Install HyperTerminal
HyperTerminal no longer comes with Windows, so one will have to download the HyperTerminal Applet. It is possible to download other versions which often have a cost associated with it.
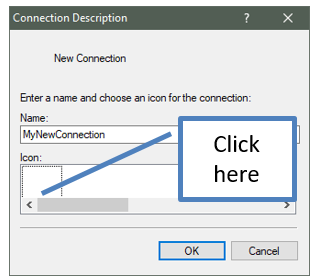
It is also possible to find hypertrm.dll and hypertrm.exe on a PC running Windows XP. These can be copied to a more modern version of Windows and run from there. You won’t have a connection icon so you’ll have to click in the blank area as in the image below.
3. Install a Code Editor
Install your preferred code editor, even a program such as Notepad can be used. I like to use Notepad++ for small projects such as this. It is available here.
4. Download the Appropriate Libraries
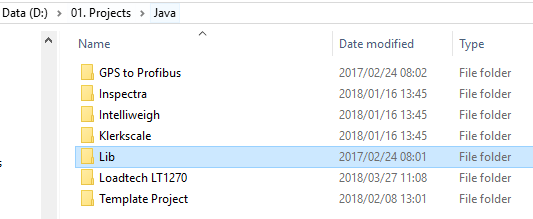
The Lib directory containing all the libraries that can be used by your code is supplied with the HMS Java SDK. I like to put this Lib directory in the same directory as my project directories so that they can all share that Lib directory:
Within my project directory, I keep the relevant project documentation and another directory called src which contains all of my source code:
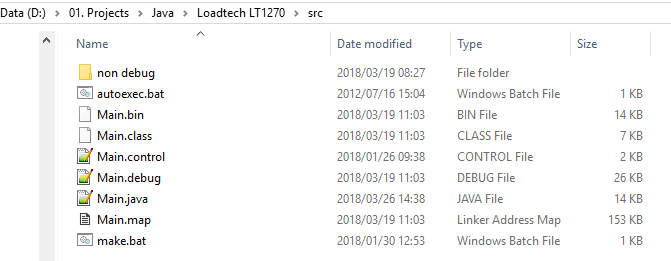
This directory structure is important to understand because in the make.bat file we talk about later, there are references to the Lib directory that is two levels up. This will mean less work when creating new projects. You can reuse the make.bat file as is, and you’re working with only one copy of the Lib directory.
Important: Lib contains all of the .jar files that you’ll need (like hms_jdk.jar) and things like a Math library. This directory contains what is available to you as an Anybus Communicator Java developer, so some modern Java functions may not be available and you’ll have to get creative in how you write your code. Perhaps you’ll even extend your library.
5. Write Some Code!
Copy the following code into a text editor and save the file as Main.java in the src directory (two levels up from Lib). Remember, the file name must be the same as the class name! We’ll look at doing something more interesting than printing out the test “Hello World!” at a later stage, for now, let’s just get our development environment in place.import java.io.*;
import java.lang.*;
import hms_jtk.abs.*;
import hms_jtk.led.*;
import hms_jtk.serial.*;
import java.lang.*;
import java.util.*;
public class Main extends Thread
{
public static void main(String[] args)
{
new Main().start();
}
public void run()
{
System.out.println(“Hello World!”);
}
}
You’ll also need to make a Main.control file. Open up Notepad, copy the following instructions (from HMS) into it and save as Main.control in the same directory as Main.java.
//———————————————————————-
// This file contains control flags (parameters) that are used by the
// ClassLinker program when generating output file from application’s
// class files. ClassLinker expects that the application control file
// will have the same name as main application file and have ‘.control’
// extension.
//———————————————————————-
// List of directories and/or library zip/jar files separated by semicolon.
// LinkClassPath is used to find files required for linking application
// classes.
LinkClassPath=.;….libjava.jar;….libjavax.jar;….lib;….libhms_jtk.jar
// Map file contains detailed information about all classes composing
// the final binary image.
// Possible values: Y or N
// If ‘Y’ is specified then a file with extension ‘.map’ is created.
// Output map file can be created in HTML format if MapFileHtml
// switch is set to ‘Y’. The file extension is then ‘.map.html’
MapFile=Y
MapFileHtml=N
// List files contain source code mixed with java bytecodes.
// If file name is specified then a list file with extension ‘.list’
// is created.
// Multiple list files can be created by separating the class file
// names with semicolons.
// Output list file can be created in HTML format if ListFileHtml
// switch is set to ‘Y’. The file extension is then ‘.list.html’
ListFile=
ListFileHtml=Y
// Possible values: Y or N
// If Y is specified then all console output is suppressed.
// However, all error messages will be printed.
QuietMode=N
//Amount of references (0 = System default)
References=0
//Amount of strings (0 = System default)
Strings=0
//Amount of user threads (0 = System default)
Threads=0
//Amount of software timers (0 = System default)
Timers=0
//Platform the java application should be built for (<=16 characters)
Platform=ABC
6. Compiling the Code and Holding Thumbs that it Works!
To compile the code we will put all the commands we need to that in a Windows batch file. In the code below, you will have to make sure that the JDK_Home path matches that of the JDK you installed in step 1. In addition, you may need to adjust the -classpath arguments to point the Lib directory we spoke about in step 4. If you have the Lib directory two directories up from where your Main.java source file is, then you won’t need to edit the -classpath arguments.
Copy the following instructions into a text editor like Notepad and save the file as make.bat in the same directory as where you stored the Main.java file
@echo off
set JDK_HOME=C:”Program Files (x86)”Javaj2sdk1.4.2_11
if %JDK_HOME%.==. goto SETHOME
echo Compiling…
%JDK_HOME%binjavac -g -target 1.1 -classpath .;….libjavax.jar;….libhms_jtk.jar -bootclasspath ….libjava.jar *.java
if errorlevel==1 goto ERROR
echo Linking…
set CLASSPATH=….libClassLinker.jar;….lib
%JDK_HOME%binjava ClassLinker -f Main -d
if errorlevel==0 goto EXIT
:ERROR
echo Build failed
goto EXIT
:SETHOME
echo Missing JDK_HOME environment variable. For example: SET JDK_HOME=C:JDK1.3
:EXIT
pause
make.bat
You can run this batch file from the command line or by double-clicking it in Windows Explorer. This will be your debugger and any errors will be displayed here. Hopefully, there are no errors and the code compiles and leaves you with a Main.bin file that we will be using to send to the Anybus Communicator. This binary file contains all the instructions the Anybus Communicator needs to follow for that application.

7. Create an Autoexec.bat file
While we are making batch files, let’s make another one that we will send to the Anybus Communicator and will allow the Main.bin program to start automatically when the unit is powered. Open Notepad and type in the following instructions:
Main.bin
Save the file as Autoexec.bat in the same directory as the Main.bin directory.
8. Physical Connections
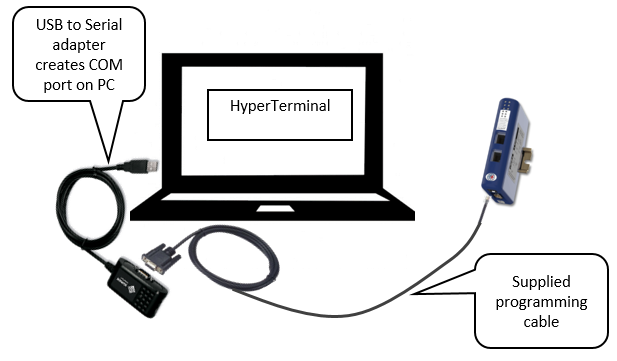
Connect the Anybus Communicator to a 24V DC power supply and connect the supplied programming cable to the RS-232 port of your PC (most likely via a USB to Serial adapter) and the RJ11 jack of the Anybus Communicator. A typical layout will look something like this:
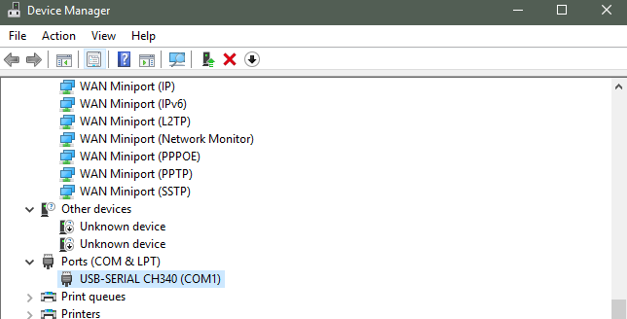
9. Check your COM port number
Open Device Manager on your PC and check that the COM port is available and healthy. Note the COM port number. In my case, it’s COM port 1.
If you are using an Ethernet to Serial converter like the one I spoke about in this blog post, then the COM port won’t be in the device manager but rather in the Serial/IP Control Panel in Windows Control Panel.
10. Connect via HyperTerminal to the Anybus Communicator
Make sure the programming cable is connected as in step 7 and open HyperTerminal to create a new connection. Select the COM port as per step 8:
Set the port settings to be as follows:
A blank terminal should be visible. Note the connection status. It is possible to save the connection for future use:
Power up the Anybus Communicator (or cycle the power if you have already powered it). If your COM port is working correctly then you should see the following start-up sequence:
You’ll notice that the Anybus Communicator already has a program running on it out of the box (note that if someone has programmed the gateway before you there may be another program on it). We will now quit the default program a load our own “Hello World” program onto it.
11. Uploading our Program to the Anybus Communicator
– Type in “q” to quit the program (if there is a custom program already running on the gateway and “q” does not work, you could try hit “esc” really early in the boot sequence before the program starts).
– Type in “rb” (read binary) and then “enter” to start the receive binary file sequence.
– You’ll have to work quickly here… From the menu, select “Transfer” -> “Send File”
– Browse for the Main.bin file you compiled in step 5, select Ymodem and press the “Send” button:
If you do not complete the last two steps quickly enough, the rb sequence will end and you’ll get a “synchronization” error. No problem, just type “rb” again and repeat the last two steps…just be quicker this time!
You should see a window that looks like this:
– Once that completes, type in rb again to send the autoexec.bat file that you made in step 6 to the Anybus Communicator in the same way you uploaded the Main.bin file.
By rebooting the Anybus Communicator, your “Hello World” program should start up automatically!
If you think there is a step missing here, let us know and we’ll be glad to help out. If you need someone to code the solution for you, we can certainly help out there too. We’ve done loads of applications using the Java Enabled Anybus Communicator. We’ll demonstrate some more real-world implementations in future blogs…something more useful than “Hello World” 😉